Tuesday, November 13, 2012

Tortilla Espanola!


A dear friend of my husband's visited us for lunch yesterday. His name is Luis and he is a lover of all things Spanish! His passion for Spanish food and culture is infectious and not at all arrogant. Luis also comes from a family of farmers and his father is the maker of Spain's finest Iberico. 

Inspired by Luis's culture, I decided to bring some of his national dishes to our home yesterday and made something quintessentially Spanish- Tortilla Espanola.

There are a lot of different methods to this recipe but if you want to stay true to form don't be persuaded to add any ingredients apart from these four- eggs, potatoes, sour cream (optional) and olive oil. The sour cream is my personal addition and only enhances the simplistic beauty of the dish.

I love how easy this is to eat, the sweet onion with a bit of bite dancing around my tongue with velvety potatoes and fluffy egg! It's divine!

Ingredients:
3 yukon gold potatoes peeled and cut into 1-2" cubes
6 eggs
1 large spanish onion, large dice
1/2 cup sour cream
olive oil
salt to taste

Method:
Preheat oven to 350.


Put potatoes in a small pot, cover with water and a dash of salt. Bring to a boil, remove from heat and cover for 5 minutes. Drain potatoes

Heat about 1.5 tablespoons of oil in a nonstick ovenproof skillet, when hot add the onions and cook on medium heat for about 1 minute. Add the potatoes and cook for about 5 minutes, frequently folding over with a wooden spoon. Taste the mixture for seasoning, add salt if desired. Strain the potatoes and onions of any excess oil by place on a strainer.

Beat eggs, sour cream and a pinch of salt and together. Add the potato and onion mixture and beat in with large whisk.

In the same pan you cooked the potatoes and onions in, remove any extra bits that may burn. Put 1.5 tablespoon oil on the pan, swirling it around so it coats the pan and put the heat on high. When it first starts to smoke, add the egg mixture and reduce the heat to medium. Cook for 1 minute. Place in the oven and bake for 10-15 minutes or until the egg has set.

Remove the pan from the oven. Carefully place a large dinner plate over the pan and flip it over. You can do this while hot or wait for the pan to cool as this can be enjoyed cold or hot!

Monday, July 30, 2012

Perfect Potato Gnocchi


There's nothing I cherish more than the combination of good food and family. Keeping this in mind, you can only imagine how excited I was to have my brother visit from Toronto! My brother Tristan is quite simply- amazing. He's brilliant, funny, artistic and shares my obsession with food. I know he's a big fan of gnocchi so I thought we could make some and serve it with oxtail ragu. It was delicious and he had about three proper servings!

I have tried MANY gnocchi recipes- ricotta gnocchi, boiled potato gnocchi, roasted potato gnocchi etc and no recipe tastes as good as this! It's light and pillowy yet maintains a certain level of density that we look for in a gnocchi. If you love this little potato dumpling as much as I do I urge you to make it! It's deceptively easy and doesn't require too much skill.

Ingredients:
2 pounds russet potato
1/2 cup freshly grated parm cheese
1/2 teaspoon salt
1 and 1/4 cup flour
4 egg yolks

Method:
Pierce potatoes with a fork and bake in a 400 degree oven for 1 hour or until cooked (as you would a baked potato).

Remove potato from skin and place in a ricer. When complete, on a clean surface, make a mound of potatoes and make a well in the center. Dust your hands with some flour. Add the eggs and cheese to the well and mix until just encorporated. Add the flour 1/4 cup at a time, kneading until you get a smooth dense ball. You may or may not use all the flour. You want it to be firm yet soft and not dry....use your intuition. Cut the dough into eights, roll between your hands so it makes a long rope that is about 3/4 inch thick. Cut into bite size pieces and either boil in salted water or place on a tray lined with parchment paper and sprinkled with flour and refrigerate until needed. Make sure that when you refrigerate your gnocchi is completely covered in plastic wrap so it doesn't dry.

Wednesday, June 27, 2012

Kale and Raisin Salad


My English brother-in-law observed that NYC has exploded with kale. Not literally of course. He couldn't help but notice that since he visited a couple years ago, the mighty green leaf has been popping up in some of NYC's best restaurants. Whether it's sauteed, baked or raw- kale is all the rage.

Influenced by the New York culinary scene, I started making kale salads a year or so back. However, I just discovered the best way to make it when eating at my neighbour Allison's house in good old Westchester. Allison made a really delicious dressing of balsamic, lime, honey and oil. She also tossed in slivered almonds and sweet raisins. I didn't think I'd enjoy it given that I'm not a fan of raisins in my food but I couldn't have been more wrong!

This salad was delicious. The acidity of the dressing broke down some of the tougher fibers in the kale and plumped up the raisins. The almonds added another dimension of nuttiness. It was sweet, sour, crunchy and SLIGHTLY bitter. The perfect balance of flavours!

Ingredients:
1 bunch of curly kale, washed thoroughly and chopped finely
1/4 cup raisins
1/4 cup slivered almonds
1 lime, juiced
1/2 tablespoon fig infused balsamic (balsamic will do)
1/2 tablespoon honey
1 tablespoon extra virgin olive oil
2 tablespoons grape seed oil
salt and pepper to taste

Method:
Mix the honey, oils, vinegar, lime juice, salt and pepper. Put in a microwave safe cup and heat for 10 seconds to melt the honey. Add the raisins to the dressing. Toss with the kale and let sit an hour in the fridge before serving. Add the almonds and toss well.

Friday, June 22, 2012

Raspberry and Cracked Pepper Parfait

So we've had a bit of a heat wave! With weather reaching the 100's I'm really in no mood for comfort food. I need to feel refreshed! I've had a diet of ceviche, ice cold coconut water and guacamole the past couple of days until I made this little treat! I wanted something creamy, sweet and fresh but couldn't be bothered to run out and buy ice cream. Instead I put together this lovely little parfait comprised of Greek yogurt, summer fresh raspberries, mint, honey and for a surprising little kick- fresh ground black pepper. "Ground pepper"?!?! You ask... "Yes"! Is my answer. It adds a playful little punch to the predictable flavor palette.

Ingredients:
1/4 cup raspberries
1/2 cup full fat Greek yogurt
4 mint leaves, ripped
a good drizzle of honey
two cracks of fresh black pepper

Method:
In your cutest bowl or martini glass assemble the parfait in the following order: Yogurt, berries, mint, honey and cracked pepper. Make in advance and refrigerate or eat straight away!

Thursday, June 21, 2012

My Very First Garden


I was in the 7th grade and cycled over to my best friend's house. His name was Carmen and he was Italian. His father, a very strong and broad man called us over for a snack. He set up a makeshift table with two crates for chairs. On the table he had a bottle of homemade wine, imported olive oil, a very rustic loaf of bread, salt, a plate and knife. "What kind of snack is this?!" I thought silently as I watched him walk over to  his garden. The sun bathed the scene and shone over tall tomato vines bearing the most beautiful red fruit. With the ease of one hand he plucked three tomatoes, washed them off with a hose and brought them to our table. I watched in awe and wonder as he roughly cut them, poured silky olive oil on them and lovingly sprinkled some salt. He ripped three pieces of bread from the one loaf, only looking up to say "mangia". We dipped bread in an oil enhanced by the sweet juices from summer ripe tomatoes, barely saying anything to each other. We were silently appreciating the simple joys brought to us by a man and his garden.

I vowed then that I would one day have my very own garden and make simplistic delicacies. I would literally reap what I sowed. And 15 years later I finally have one of my own and I absolutely love it! Every morning I run out and see what new developments took place. My string beans have sprung, some of the lettuces are mature, the zucchinis have blossoms and little baby buds and my tomato vines have shot up to the height of my thigh!

I cannot wait to post future developments and make meals sourced from my little garden:)

Sunday, May 27, 2012

Pear Tarte Tatin Parcels


Tarte tatin, be it pear, apple, peach or banana is one of my favourite desserts ever. I love the generous amount of flaky pastry, bittersweet caramel and slow cooked fruit!  Instead of going the traditional route of making a large pastry, I thought personalized little parcels would look a lot more impressive. Also, you get more of the amazing buttery pastry this way!! Although the dessert looks sophisticated, I promise that if you follow the steps exactly you will absolutely nail it!

I made these a couple of hours prior to serving them. They taste amazing fresh out of the oven or at room temperature!

Ingredients:
2 firm pears
4 star anise
1/4 cup room temperature butter
1 teaspoon lemon juice
1/2 cup sugar
1 package good quality puff pastry

Method:
Preheat oven to 425.

Meanwhile, peel, trim and core your pears (try to do it with a small melon baller). Press the star anise into the core of the pear so that it holds. Place the pear core side down and cover with puff pastry. Trim the edges off with a knife. Place on a baking tray lined with parchment paper and leave it in the fridge while you prep your caramel.

Place the lemon juice with the butter. Meanwhile, Put a thing layer of sugar in a non-stick ovenproof pan and set stove temperature to medium high. When the sugar starts to melt add another layer of sugar. Don't stir the sugar. Instead, slowly move the pan around in a circular motion using the handle. Repeat until the sugar is finished. When the sugar melts to a sort of light cola colour, turn off the heat and add the butter and lemon. Use a spoon to softly swirl the butter around. Continue to move the pan around so that the butter gets fully incorporated.

Place the Pears pastry side up and bake for 15-20 minutes or until the pastry is golden. Remove from oven and let cool for two minutes. With a palette knife, carefully remove the pear pastry and serve pastry side down with ice cream!

Thursday, May 10, 2012

Roasted Tomatoes


I had a friend over for lunch today and wanted to make some very rustic, tasty and light foods. I served my go-to dishes- roasted salmon, baked veggie medley, salsa verde... but I wanted to add a kiss of summer. Foraging through my kitchen for inspiration, I spotted some tomatoes I had purchased the other day and... Eureka!

I love roasted tomatoes. Even when they're baked through they look like little presents, tidily holding all these beautiful juices that are released to the cut of your knife. What adds dimension and depth is the extra virgin oil and herbs that I lovingly bathe my tomatoes in before putting them in the hot oven...It's just divine.

You can serve this as a side or as an appetizer with some fresh baguette!

Ingredients:
10 tomatoes, washed and halved (preferably with their tops in tact)
3 tablespoons extra virgin olive oil
1 clove garlic smashed or grated
1 teaspoon finely chopped basil, oregano, rosemary and thyme (you can do all four, just one or another mix of fresh herbs..whatever you like!)
salt and pepper to taste
1/4 cup feta cheese

Method:
Place oven setting on broil.

Meanwhile, mix herbs, garlic and olive oil together.

Place tinfoil on a baking tray and rub a teaspoon of oil on it so that the tomatoes don't stick. Place the tomatoes close together, sprinkle with salt pepper and drizzle with the olive oil mixture, making sure to get the herbs and garlic on the tomatoes as well. Reserve any left over oil for finishing.

Place in the oven for 15-20 minutes or until your tomatoes soften and brown on the edges. This time may vary in your oven so check every five minutes. When they're done,  turn oven off, sprinkle generously with feta and return to the oven for 1 minute. Remove and spoon any extra oil on tomatoes. Serve hot or room temperature with fresh bread!

Wednesday, May 9, 2012

Chicken Marbella


I'm the first to raise my hand and admit that "I do not enjoy fruit in savory meals". However to every rule there is an exception and this, my dear friends, is mine.

I would never have ordered or attempted to make chicken marbella. Our union was a happy accident as I was over a friend's home for dinner and it was served as the main course. Although the chicken looked delicious, I was skeptical because of the  prunes... But let me tell you- it was DEEEEEELICIOUS! I mean it totally rocked my palette. There was so much going on! The tangy sauce and salty capers were totally offset by the sweet prunes that literally rendered down to these delicate pillows of ooey gooey goodness. Agh. On top of that she made a kale salad with raisins...again I didn't know how I would feel about that but i LOVED it!...(post to follow).

I had to make this recipe for myself and it was so so so so so so so good! Also, I've ben telling my friends how much I love it and they're also quite shocked because they know how strongly I feel about the incompatability of fruit in savory dishes.. But It's now totally flawed.

I'd like to conclude with the wise words my mother said when having me eat something new and or foreign "How do you know you don't like it if you don't try it" ?! ...

Ingredients:
2.5 pounds skinless boneless chicken breast cut into chunks
1 cup pitted prunes
1/2 cup red wine vinegar
1/2 head of garlic peeled and pureed
1/2 cup olive oil
1/4 cup capers with a teaspoon of juice
2 tablespoons dried oregano
4 bay leaves
3/4 cup brown sugar
1 cup white wine
1/4 cup freshly chopped Italian parsley

Method:
Salt and pepper chicken. Place in a baking dish with prunes, vinegar, oil, garlic, oregano, capers and bay leaves. Cover and marinate in the fridge overnight.

Preheat oven to 350. Pour white wine over chicken and sprinkle the brown sugar over all the chicken. Cover with tin foil and bake for 20 minutes. Uncover, baste the chicken and bake 30 minutes longer or until chicken is thoroughly cooked.

Thursday, April 26, 2012

Blueberry Cake


Uncle Bert celebrated his birthday this Tuesday and in honor of our beloved uncle's birthday we celebrated with good eats and blueberry treats! I had my entire menu planned and decided I would run out and buy a pie. However, I felt like it was a bit of a shortcut and wanted to present my uncle with a lovely meal that I made from start to finish.

I know he likes desserts with fruit and since I didn't have enough time to make pastry for pie I made a blueberry cake! This cake is amazing. It's deceptively airy and moist. The batter amounts to very little but rises perfectly and completely envelopes the blueberries in a bed of cakey goodness. The outer parts of the cake develop this wonderful golden brown crust which adds a welcome texture. For a bit of drama, it's recommended one adds powdered sugar. As much as I like the aesthetic, I'm not a fan of the extra sweetness and decided to forgo the additional calories. Even though it would have looked more whimsical with the snow-kissed powdering, I think it looks pretty lovely without it too!


Ingredients:
1.5 cups FRESH blueberries (don't use frozen)
1 cup flour + extra for dusting blueberries and cake pan
1 teaspoon baking powder
2 eggs
1/2 teaspoon vanilla extract
1/2 teaspoon salt
1 stick or 1/2 cup butter at room temp + extra for prepping cake pan
1/2 cup brown sugar
1/2 cup white sugar

Method:
Preheat oven to 350.

Meanwhile prep your 9" spring form pan by rubbing it all over the base and sides with a small amount of butter and then dusting it with flour. There should be a faint layer of dusted flour. Nothing that clumps.

Mix flour with baking powder and salt. Set aside.

Toss blueberries in about 1 tablespoon of flour making sure to sieve off any excess flour.

Beat butter on med-high speed for two minutes until airy and fluffy. Add the sugar and vanilla. Beat until well Incorporated (about a minute more). Add the eggs one at a time and beat on med until well blended.

Reduce the speed to low and mix in the flour. DO NOT OVER MIX. Once everything is just blended it is ready. Even if there are bits where the flour is still showing, you can fold it over with a spatula by hand. Batter will be a bit more on the cookie batter side than the runnier side so don't be alarmed.
Transfer batter to spring form pan and even out- it doesn't have to be perfect. Add the blueberries and bake for about 50 minutes or until it starts to brown lightly and a toothpick comes out clean when inserted.

Let cool for 5-10 minutes than remove from the pan- gloves may be necessary as the pan may still be hot so take caution.

Serve alone or with icing sugar or better yet- ICE CREAM!!!

Tuesday, April 3, 2012

Garlic and Herb Roast Chicken


This dish is so beautifully easy. Put it this way, I made this whilst staining the my 10 foot long picnic table with my husband! It's really so simple. The best part about this chicken is its crispy skin! There's so much crispiness! The reason being that I cut the chicken down its back so that all the skin is exposed when cooking.

I place 15 cloves of garlic and a halved onion under the chicken while baking and the end product is butter soft garlic and onion that envelopes your mouth with a velvety texture and sweet flavour that is literally to die for..well maybe not literally, but close enough!

Ingredients:
1 broiler chicken (I always buy Kosher because it's brined and is the juiciest chicken)
1 onion
15-20 cloves garlic
1 tablespoon extra virgin olive oil
1 tablespoon herbs de provence
salt and pepper to taste

Method:
Preheat oven to 400. Meanwhile, cut the chicken down its back bone (you can use good kitchen scissors or a very sharp knife). Salt and pepper the chicken to your liking. Add herbs de provence on the bottom side and generously on the skin side.  Place the garlic and onion in a contained circle and drizzle with a teaspoon of oil. Place the bird on top so that it tents the contents. Sprinkle with extra virgin olive oil.
Bake for one hour. Once the skin gets to the perfect golden brown colour, reduce the heat and cook until it's done. Let rest for 10 minutes before serving.

Serve with garlic and onion as well as the drippings!

Tuesday, March 13, 2012

Some sort of poached egg concoction...


Warning: If you're one of those people who eat each component of your meal separately, don't attempt this at home!

This isn't the type of thing to eat bit by bit, you need a little bit of everything to have the perfect bite! You see I think eating a meal is like an orchestra, it's completely the sum of its parts. Sure a trumpet sounds good alone, as well as the violin etc. However, when you listen to all the instruments in unison, what you get is something richer- a one dimensional sound that comes to life. The same can be said for food and with this dish in particular, a little piece of everything = a bite of heaven.

You have the:
1. toasted english muffin that provides crunch
2. poached egg that streams with a rich luxurious yolk
3. chilis in oil for a layer of heat
4. pickled mushrooms to cut through everything with a punchy tang
5. pea shoots which ground every bite with a welcome earthy note
6. shaved parm cheese that adds saltiness

You should really try this at home! It's completely delicious!

Ingredients:
1 English Muffin
1 egg
1/2 teaspoon Italian peppers in oil
5 pickled mushrooms, sliced (get the Italian kind)
1/4 of a handful of pea shoots or microgreens
A couple shavings of fresh parm
1 teaspoon vinegar

Method:

Bring water and vinegar to a very low simmer, just so it starts to bubble a second or so apart. Crack the egg in a ramekin. With a whisk, start stirring the water to create a whirlpool effect and gently drop egg from ramekin one at a time. Cook for about 2-3 minutes or until whites are a soft firm around the yolks. Remove from the pot with a slotted spoon and place on paper towel.

Meanwhile toast one half of the english muffin. Place egg on top of english muffin. Top with chilis, mushrooms, pea shoots and cheese.

Thursday, March 8, 2012

Afternoon Tea


I was never the little girl who had afternoon tea parties with imaginary friends, teddy bears and snacks. I was far less refined and preferred playing street hockey or tackle football with the boys. So maybe a part of me is making up for my lack of girlie childhood experiences with newfound obsessions. I just love tea parties- they're dainty, pretty and provide me with an excuse to have another meal between lunch and dinner:)

The other thing I like about afternoon tea is that you can pre-pare everything in advance. It really allows you to be a guest at your get together if you take the time beforehand!

There are a couple secrets to having a perfectly whimsical tea spread:
1. Invest in a tiered dessert tray- it naturally divides your scones, sandwiches and fruit
2. Have a selection of teas- herbal and non herbal
3. Buy cute serving plates, tea pots and teacups

I served scones with fresh jam, smoked salmon, chicken and egg salad sandwiches. I will share my treasured chicken salad with you, which is my mothers PERFECT recipe.


Chicken Salad:
2-4 tablespoons full fat hellmans mayo
2 skinless/boneless chicken breasts
1 whole celery rib + 1 celery rib finely diced
1/2 chicken bouillon cube
1 whole onion +1 tablespoon finely diced onion (as fine as you can without making it into a paste!)
1 tablespoon relish
salt and pepper to taste

Method:

Place one rib of celery, chicken, chicken bouillon cube and one onion (quartered) in a pot and cover with water. Bring to a boil and simmer gently until the breasts are cooked. Remove from pot and let cool. Shred the chicken into stringy pieces (quite time consuming, but worth it!). 

Meanwhile, place your your diced onions in a strainer with a teaspoon of salt and rinse under cold water. Drain. 

Mix two tablespoons of mayo, relish, diced celery, diced onion, salt and pepper. Add the chicken and blend well. Taste. Add more salt or mayo if needed

Tuesday, March 6, 2012

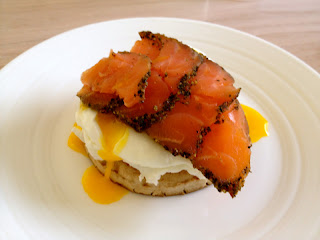
Smoked Salmon, Poached Eggs, Super Toasted Crumpet... C'MON!


I'm the type of person who wakes up in the morning to my stomach- it grumbles and roars, demanding some fuel to start the day. I'm also the type of person who falls asleep at night to thoughts of what I'll eat in the morning. "What will it be tomorrow?" I ask sleepily as I rest my head on the pillow.

Today it was my take on eggs benedict. I really enjoy eggs benedict but no more than two or three or four bites, but I stop at four... it's just too rich for me. The rich egg yolks that cascade over the english muffin coupled with the 12 yolk and 1cup of butter sauce is delicious at first but grows overwhelming fast! So I ommitted the delicious but intense hollondaise and replaced the english muffin for an even better English counterpart- the crumpet. If you've not had a crumpet, it's well, amazing! It's spongy but takes well to toasting and has all of these wonderful porous holes that soak in whatever you give it- butter, jam, or in my case-yolks!

You have to try this dish! The hardest part is the poaching, which is not really that hard at all! Totally worth the assembly!

Ingredients:
2 eggs
1 teaspoon vinegar
as many pieces of smoked salmon as you please
1 crumpet

Method:
Bring water and vinegar to a very low simmer, just so it starts to bubble a second or so apart. Crack the egg in a ramekin. With a whisk, start stirring the water to create a whirlpool effect and gently drop egg from ramekin one at a time. Cook for about 2-3 minutes or until whites are a soft firm around the yolks. Remove from the pot with a slotted spoon and place on paper towel.

Meanwhile toast your crumpet on a high setting. Remove, place eggs on top and finish with smoked salmon. Enjoy:)

Sunday, March 4, 2012

Pasta and Bean soup?....


I once had a friend whose grandmother had eight fingers. Now with the unripened maturity of a 9 year old girl, having less than 5 fingers on each hand was a thing of bewilderment and wonder. How did she lose them I thought silently as I watched her strain pasta and mix it into a large pot. Could it have been during the war? Perhaps she lost them cooking, or maybe she never had them to begin with? My mind twisted and turned, seconds felt like hours as she approached closer and closer with a heaping bowl that she lovingly made for her granddaughter's after school snack. The fingerless scenarios made me feel a bit sick and I panicked as I felt my enormous after school appetite slipping... But she put before me a beautiful bowl of pasta, drizzled with extra virgin olive oil and parmesan cheese. I closed my eyes, inhaled and thought "wow, this Nonna can COOK!"  

It looked so good, it smelled so good- fresh tomatoes, beans and garlic looked so beautiful on the plate. So inviting that the missing fingers were the last thing on my mind. I had one bite, two bites, three bites- it was a crazy haze of spoonfulls. The amazing thing was that I couldn't tell whether I was eating a pasta sauce or soup. It was a soupy pasta sauce! It was divine. Her Nonna smiled, bemused by my zest for "simple, peasant food" and happily gave me a second serving and third!

I thought of my long lost friend's Nonna recently and did the best I could recreating her delicious pasta dish! It was pretty darn good! The mashed beans, fresh tomato sauce and sweet garlic danced around my mouth and brought me back to my childhood days where I was exploring the most delicious Italian cuisine through my friends Nonnas- some of the finest cooks I've ever had the pleasure eating from!

Ingredients:
1 can cannellini beans, drained and washed
4 cloves garlic, peeled and smashed
1/2 teaspoon chili flakes 
3 basil leaves thinly sliced
5 large ripe tomatoes, cut into eighths
2 tablespoons extra virgin olive oil
1/2 package penne pasta
as much freshly grated parm cheese as you like!

Method:
Heat olive oil in a large saute pan. Add the garlic and cook gently cook until it softens, you don't want too much colour-just a very light golden brown. Add the chili flakes, basil and tomatoes. Cover and reduce heat to med-low for 5 minutes. Remove lid and press down the tomatoes with a wooden spoon to help break them down. Add the cannellini beans and cover. Cook 10 minutes longer. Mash 1/2 of the beans with your spoon so that they become part of the sauce. Add a ladleful of pasta water to the sauce and bring heat to med-high. Let simmer to the consistency you like. 

Meanwhile, bring a large pot of salted water to a boil and cook penne. Drain and toss pasta into the sauce. Top with cheese and a good drizzle of extra virgin.

Thursday, February 16, 2012

Chicken Posole


Few things make me feel more warm and cozy than a hearty hot bowl of soup or stew. I love making dishes like this on a cold winters day. I pour ladlefuls into a bowl, tuck my knees into my chest and enjoy spoonfuls of deliciousness as I watch snowflakes whirl around in some sort of whimsical dance.

This soup/stew is just divine! There's the heat from the jalapeno, the crunch and sweetness of the corn and homily as well as an acidic little kiss of lime! I love balance in food- balance of colour, texture and taste. This soup excels in all arenas and is totally worth the effort! It's not as though it's difficult per se, it just takes time to grow and flourish into something that's totally worth the wait!

Ingredients:
whole broiler chicken cut into eighths
2 tablespoons peanut, canola or vegetable oil
3 cloves garlic thinly sliced
51/2 cups chicken stock
1-2 fresh jalapeno cut into thin rounds (the more seeds the spicier)
1/2 orange or red bell pepper diced
4 ears of fresh corn
2 cups yellow or white hominy
2 limes juiced
1/2 cup coarsley chopped cilantro leaves
salt and pepper to taste

Method:
Salt and pepper chicken and let rest for 20-30 minutes in room temp. Heat oil in a large dutch oven. Lay chicken skin side down in batches. Let it get nice and golden brown, flipping over only once. Let rest on a plate .

Add the garlic to the oil and let it get lightly golden for about 30 seconds, add the chilis and cook for another 10 seconds. Add the chicken stock and bring to a simmer. Return the chicken and all its juices to the pot and cook on a low simmer for 1.5 hours. Add the corn, homily, lime juice and cilantro and cook for 30 minutes more. Salt and pepper to taste. The chicken will fall off the bone and be so incredibly tender! Serve with rice or tortilla. Deeeeeelish!

Tuesday, February 7, 2012

Baked Salmon and Mixed Veggies


When I say YUM you say YYYY...YUM---YYY YUM----!

Yes, I just did that. This salmon number is so good it makes me want to cheer. I've moved to a house and feel so inspired by the treelined streets, fresh produce from local farms and cooking in my kitchen that bathes in glorious sunlight.

All the colours around me have manifested in this rather colourful dish of pinky-orange salmon, green rapini and asparagus, red bell pepper, golden potatoes and vibrant sweet yams.

What adds shimmer and shine to the salmon is a dressing I prepared before hand that I generously spoon over the fish making it even more moist and flavourful. You must must must try this!

Ingredients:
1-2 lb salmon fillet
1 teaspoon herbs de provence
1 potato, cut into eights
1 sweet potato cut into eights
1 leek, washed well and cut down the center and then in fourths
2 shallots, cut in half
2 cloves of garlic, smashed
a handful of rapini, stems removed and cut into fourths
a handful of thin asparagus, stems removed
1 red bell pepper cut into large pieces
1 tablespoon extra virgin olive oil
4 sprigs of thyme

Sauce:

1/4 cup cilantro
1/2 teaspoon dijon mustard
1/2 teaspoon whole grain mustard
1/2 teaspoon sambal oelek
juice of half a lemon
2.5 tablespoon extra virgin olive oil
salt and pepper to taste


Method:

Preheat oven to 400 degrees. Toss all the veggies apart from the pepper, asparagus, leeks, shallots and rapini together with salt, pepper,thyme and extra virgin olive oil. Place in the oven for 30 minutes. Remove from the oven, toss in the shallots, leeks and bell peppers well so that it's also has some oil, if there isn't enough add a bit more oil. Cook for another 10 minutes. Remove and add the rapini and asparagus and cook for another 10 minutes. You may want to check the potatoes when you remove them if they're browning too much.

Season salmon with salt, pepper and herbs de provence and place on a baking tray lined with tinfoil. Place in the oven until cooked to your degree of doneness.

If you're comfortable with your kitchen abilities, place the salmon in the oven while the veggies are cooking and time it so they finish at the same time. If not, you can always reheat your vegetables. When the salmon is cooked, spread a tablespoon of the sauce over it, reserve the rest for serving.

For the sauce... place the cilatnro and mustards in a mortar and pestle. Pound a couple of times. Add the lemon juice, sambal and extra virgin olive oil and stir well. Add salt and pepper to taste.

Tuesday, January 31, 2012

Pesto, Salmon and Asparagus Penne


Soooooooooooooooo Deeeeeeeeeeeeeeelliiiiiiiiiiiiiiiiiiiciiiiiiiiiiiiiooooooooooooouuuuuuussssssss!

I absolutely love this pasta. It's a great way to have pasta if you really want it but don't want all the carbs as it's loaded with so many other delicious things such as blistered tomatoes, salmon and lovely asparagus. Also, it tastes fresh, fresh fresh! The tasty homemade pesto and earthy asparagus are just wonderful. I highly reccomend this dish, it's totally worth the effort of making your own pesto too!

Ingredients:
1 lb salmon fillet
2 cups fresh basil leaves that have been washed well
2 cloves garlic, smashed
1/2 cup extra virgin olive oil + 1/2 teaspoon
2 tablespoons pine nuts
1/2 tablespoon lemon juice
1/2 cup freshly grated parmigiano reggiano
salt and pepper to taste
pasta (as much or as little as you like)
a handful of skinny asparagus, stemmed and cut into fourths
1 cup baby tomatoes

Method:
Preheat the oven to 420. In the meantime put  the basil, pinenuts, olive oil, lemon juice, parm cheese and garlic in a blender and blitz until it's a consistency that resembles pesto. Reserve.

Line a baking tray with tin foil and place the salmon on top. Season with salt and pepper and olive oil. Bake for about 8-10 minutes or until the fish is slightly undercooked. Let cool and flake with a fork.

Meanwhile bring a large pot of salted water to a boil. Add the pasta and cook to your liking. 1-2 minutes before your pasta is ready add the asparagus. Cook for a minute or two and strain (reserve 1/4 cup of pasta water).

In the meantime, heat a little bit of olive oil in a pan and add the tomatoes. Let them cook on med-high until they start to blister. Reduce heat to low, season with salt and pepper. Add the salmon, pesto, pasta and asparagus. Toss well and add some pasta water if you want to loosen it up a bit. Serve with cheese and a sprinkle of chili flakes!


Monday, January 30, 2012

BBQ Beef Ribs and Potato Salad


Very few things go together better than barbecue and potato salad! I love barbecue- the mixture of sweet, salty, spicy and sour are hard to beat! I also love the way potato salad enhances the bbq experience as the velvety mayonaisse laced potatoes provide the perfect backdrop to the ooey gooey tender ribs.

There are a lot of rib purists out there who believe that it's sacrilege to bake ribs before bbq'ing them. To those people I say "Ha!". BBQ beef ribs are quite lean and have a tendency to grow tough. To avoid this, I slowly bake them until they're to my desired tenderness and then I grill them for the lovely char that they're just pining for! You have to make these ribs and this salad. They're a match made in heaven!

Ribs Ingredients:
2lbs beef ribs (of course get more if there's more than two of you!)
your favourite bbq sauce (I love Diana's original)
1 tablespoon ketchup
1 teaspoon franks red hot sauce
1/2 cup orange juice
salt and pepper to taste
1 teaspoon chili powder

Method:
Preheat oven to 375. Rub ribs with salt, pepper and chili powder. Mix a bottle of bbq sauce with ketchup and franks red hot sauce. Divide the mixture in half, placing 1/2 into a baking tray with orange juice. Coat the ribs so that there's enough fluid to cover it by more than half. If this isn't the case add more bbq sauce and orange juice.

Cover the ribs in tinfoil and place in the oven. Cook until tender (about 45 minutes-1 hr) but not too tender that it falls off the bone! Remove from the oven and place ribs on a hot grill until they char evenly on both sides. Remove and toss into the remaining bbq sauce mixture. Serve with potato salad.

Potato Salad Ingredients:
5 Idaho potatoes
1/4 cup mayonaisse
1-2 tablespoons dijon mustard
1 scallion thinly sliced
1/2 teaspoon franks red hot sauce
1/2 a celery stock thinly sliced
salt and pepper to taste

In a large bowl, mix the mayo, mustard, celery, scallion and hot sauce. Reserve. Put potatoes into large bite sized pieces and bring to a boil in a large pot of salted water. When the potatoes are fork tender remove and drain. While they're still piping hot add the potatoes to the mayo mixture. Toss until well coated. If you like it really mayonaissey add a little more of everything. Taste and season with more salt and pepper if needed.

Friday, January 13, 2012

Flower Design


I know this has nothing to do with food but I think there is a correlation between flower arranging and food. There's a thoughtfulness, recipe and flare that both require. Also, when I have guests over I feel like ambience is just as important as the food... and flowers set the tone perfectly!

I took a wonderful flower arranging class with Lisa Fireman Dorhout (great name right?!), owner of Studio Sweet Pea in NYC. It was great! She shared some wonderful tips and "recipes" for flower arranging. The best part about it is that apart from some basic rules, the sky is the limit! You can do whatever you please, it just takes practice, patience and creativity...kind of like cooking! I cannot wait to have my next dinner party!

Tuesday, January 10, 2012

The Perfect Steak


When it comes to steak I like a fresh cut of well marbled meat and I like to eat it medium rare but more on the rare side. The veiny fat from the meat renders upon contact with heat and works to baste your steak in the most luxurious bath of warm, rich, velvety goodness. My husband and I devoured this carving board... was trying to pack his lunch with whatever scraps we had left!

There is a holy trinity that must be respected when pan searing your steaks. You need high heat. You must flip the meat ONCE only. You must end the cooking process with a 3-5 minute rest (depending on its size) and butter. If you get these steps in order you are good to go! Your meat will be perfectly pink in the center and charred on the exterior! It's just divine!

Ingredients:
Steak of your choice
Dry seasoning of your choice
Canola oil (about 1 teaspoon)
1 teaspoon of butter per steak

Method:
Remove steak from fridge 2 hours before serving as you want it to come down to room temperature. Season with salt and pepper and your favourite dry spice blend. Find a skillet large enough for your steak (not so it just fits, you need a bit of breathing space) and place it on the oven. Put the heat on high and let it get really hot (hot so that the oil lightly smokes when you place it in the pan...about 3 minutes or so depending on the size of your pan). Add the oil and place your steaks down gently. After about 3 minutes flip over. Note: The cooking time depends on the thickness of your steak. Mine were about a pound each and just shy of an inch thick. I cooked them for 3 minutes on each side. If your uncertain, insert a meat thermometer (medium rare is 130).

Remove from the pan and top with room temperature butter. Let it stand for 5 minutes before cutting or serving. I served mine with chimichurri...Agh! So darn good!


Chimichurri Ingredients:
2 cups fresh parsley
1 tablespoon fresh mint
2 cloves garlic
1 cup extra virgin olive oil
3 tablespoons red wine vinegar
1 tablespoon lemon juice
1 tablespoon sambal (spicy chili sauce)
1-1.5 teaspoon salt

In a food processor blend all the ingredients together until it they're all evenly combined and make lightly chunky sauce.. If it's too thick add more extra virgin olive oil.

Salmon En Croute


Leeana is one of my dearest friends- she's fun, loving, kind and loves food as much as me. We went to culinary school together and partnered up to cook a meal for our graduation ceremony. In the kitchen we achieve a lovely balance- bringing different skills to the table. Leeana is very precise. She cares about rules and beauty and stays true to the recipe she's following. I on the other hand am a bit carefree...or careless (it really depends on who you speak to). I don't really follow rules that well and care more about the eating than presenting. Some of our best meals happen when we're jamming in her kitchen. We play tunes, snack, catch up and cook! It's the best!

We made salmon en croute, a pear goat cheese and pecan salad and some pan seared cauliflower. Everything was delicious but the most delicious star of the show was the salmon en croute. It's deceptively easy to make. You will giggle with villainous delight as your friends sing your praises and think you slaved away over dinner... but oh no no no! You totally didn't! Those are the best meals- the meals that have so much wow factor and give you enough time to pretty yourself up for the party;)
You'll also sink into your chair a little when you have your first bite- you get the perfectly steamed salmon that's infused with pesto tented under this golden delicious crust.. WOW! I love it!

Ingredients:
1 12 ounce salmon fillet (for two people)
2 tablespoons pesto (see my chicken pesto pizza recipe)
1 package good quality puff pastry
1 egg
salt and pepper to taste

Method:
Debone the fillet- there shouldn't be any when you buy it but triple check! Sprinkle both sides with salt and pepper. Reserve.

Sprinkle some flour on a clean, dry work surface and roll it out to exceed the perameter of the salmon by about 1 inch. Place the pastry on a baking sheet lined with parchment. Roll out another sheet to roughly the same size. Lay the salmon on top of the pastry on the baking sheet and spread the pesto over the salmon. Top with the other pastry sheet, tucking in the edges. Make three slits along the center of the pastry and brush all exposed pastry with eggwash (1 egg mixed beaten with 1 tsp of water). Bake in 1 375 degree oven for 40 minutes or until the pastry is golden brown.